Thinking of growing a birds eye chilli plant? Great choice! These compact plants are easy to grow and they produce lots and lots of yummy birds eye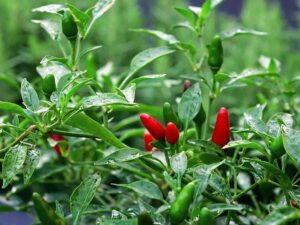 pepper fruits, perfect for use in all kinds of home cooking recipes.
As a beginner, it is a great idea to do some research so that you understand how to grow the bird’s eye chilli because it has some specific care needs.
With the tips and information below, you’ll be ready to grow a strong, healthy birds eye pepper plant that keeps giving you delicious fruits all growing season:
Why Grow A Birds Eye Chilli?
The birds eye chilli comes from Africa and in some areas you can even find it growing wild, although this is becoming less common with agricultural use of land.
They are grown commercially because they are compact, but they produce lots and lots of fruit. The fruits, which are about 5CM long and red, produce a gentle heat of around 100,000 on the Scoville Scale, which makes them easy to use in a huge range of commercially produced foods.
There are lots of reasons to grow the delicious bird’s eye chilli which is also known as the Thai Chilli or the Thai Dragon in some stores.
One of the key benefits is simply gardening, which in itself has some amazing health benefits. According to Healthline, gardening can help boost your mood, boost your immune system, reduce your stress and might even help you recover from addiction – to name just a few benefits.
The chilli plant itself is also a great choice for gardeners because the fruits are so yummy, and healthy. You also get a real sense of satisfaction and pride from growing your own produce.
When it comes to using that homegrown produce, the birds eye chilli is super versatile and can be included in both sweet and savoury cooking as well as drinks, like a chilli hot chocolate. You can also eat them fresh, or dry them yourself, even turning them into a chilli powder or sauce for use at a later date. The possibilities are endless.
As if that wasn’t enough, when you eat a bird’s eye chilli you get a dose of vitamin C, antioxidants and they can even help reduce inflammation in the body and could even promote weight loss.
These beautiful little fruits sure do pack a punch!
How To Grow A Birds Eye Chilli Plant As A Beginner
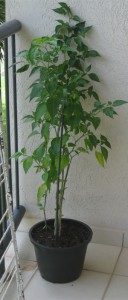
The birds eye pepper is a great choice of chilli plant for a beginner because it tends to be hardy, produce lots of fruits and it is quite compact at around 60-80CM.
To begin your growing process you need to buy some great seeds to grow. You can purchase them from suppliers on the internet, or in a local garden centre as this type of chilli plant isn’t rare. If you don’t want to grow from seed try buying some starter plants and skip a stage of the growing process.
If you are buying the plants from seed you will want to start germinating them around January-February indoors. Soak them in water for a few hours before potting to give them the best chance of germinating.
To pot them up you will need to use nutrient poor potting soil that you keep moist, but not sodden.
You should put one seed per starter pot with a little soil on top and then keep the pots by a bright and sunny window. They will take about two weeks to germinate but might come faster, especially if you keep them at around 25 degrees Celsius and keep them away from drafts.
During this time, it is better to use a spray bottle with water to keep the plants moist, rather than pouring water on them, which can dislodge the vulnerable seedlings.
Once the plants have around 4-8 leaves on them they can be placed in a bigger pot. If you are potting them up inside, keep one plant per pot of around 7.5 CM and then plant them on into bigger pots as the plant grows. If you are growing them outside they need to be around 30-40CM apart and 2-3 feet between rows which gives them space to grow and plenty of ventilation. This should only be done when the last frost has finished.
If you are moving them from outside to inside it is important to harden them off by gently exposing them to the new temperatures and light of their new spot. This will avoid transplant shock.
When ready, the birds eye chilli plants should be planted in loam based compost with a little vermiculite and perlite so that they have great ventilation.
The soil should be really loose and include at least some fertiliser in the way of worm castings or well-rotted manure.
These kinds of plants tend to do well in sunny spots of the garden, however, areas prone to heat waves can produce wilting chilli plants. If you know you are prone to this kind of weather it is worth planting your bird’s eye chilli in a partially shaded spot right from the beginning.
The plants should be soaked after transplanting to help them ‘settle in’. After that they should be watered around every other day or third day depending on the weather, keeping the soil moist but never sodden.
As a general rule the soil should never dry out completely, something you can keep an eye on by popping your finger into the soil regularly. If the plant is dry after about an inch, it needs watering.
To fertilise your bird’s eye pepper plants you can use tomato fertiliser, but some people like to use fish emulsion or sometimes seaweed.
The trick is not to over fertilize the bird’s eye pepper, as this can burn the roots and kill the plant really quickly.
If in doubt, dilute the fertiliser to around a quarter of the strength of the manufacturer’s instructions and then feed them around once a week. You can also do something called ‘pinching’ to encourage bushy growth of the chilli pepper plants, as shown in this Youtube video.
You’re Ready To Grow Birds Eye Chilli Plants!
With a little research it is always much easier to avoid common chilli plant growing mistakes and enjoy a successful growing season right away.
Hopefully, with our tips and information above you’re ready to grow and harvest birds eye chilli peppers all season long, for endless spicy and delicious recipe combinations to try out and serve to family and friends.


