Serrano Pepper: Growing Tips For Beginners

Serrano Pepper

Serrano pepper chillies are spicy and extremely versatile when it comes to the many different culinary creations you can make with them.

BecauseSerrano Pepper 
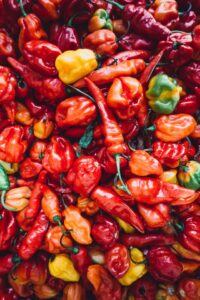
they are such a versatile fruit, many people choose to grow the Serrano pepper plant at home.

Just like any chilli plant, there’s a lot to do to make sure you grow your Serrano just right so that you can get a healthy, bountiful yield.

To help you, we’ve collected all the best tips and handy information so that you know exactly how to grow Serrano chilli like a pro:

What Are Serrano Pepper Plants?

Serrano chilli plant peppers (Capsicum Annuum Longum) were originally grown in the mountains of Mexico in Pueblo and Hidalgo.

In fact, name Serrano is actually derived from the term ‘Sierras’ – the name of the mountains in that part of Mexico.

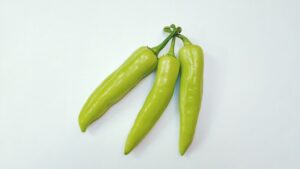
The Serrano chilli plant peppers can be red, brown, orange or yellow but are most commonly sold in a green colour.

They also average around 1-4 inches in length and they tend to be about half an inch in girth.

If you’re wondering what they are like compared to other more well known chillies, you could compare them to the jalapeño as they are similar in appearance and in their meaty, juicy, thick texture.

What Dishes Can I Use Serrano Peppers In?

Serrano chilli plant peppers are extremely versatile when it comes to cooking, which is why so many people want to know how to grow them well. They are particularly yummy in a spicy salsa, like the one in this Youtube Serrano chilli salsa recipe.

You can also use them to make spicy relishes and hot sauces, pico de gallo and even yummy savoury marmalade’s. We particularly love them pickled and then used in kebab, falafel or chicken grill wraps.

How Hot Is The Serrano Pepper?

The Serrano chili plant pepper is several times hotter than the Jalapeno pepper, scoring a Scoville Scale rating in between 10,000 – 25,000. That makes it hotter than the jalapeño which is more towards 8,000 on the Scoville Scale.

However, as it is as crunchy, dense and fresh as the jalapeño it’s a bit like a hotter, spicier relative of that popular chilli and can be used in many of the same sort of dishes that a jalapeño is.

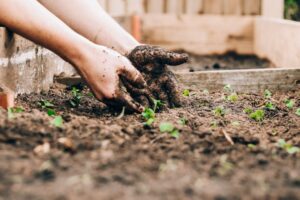
How To Grow Serrano Pepper?

Growing a Serrano chilli plant is completely achievable for any beginner gardener. To get to grips with how to grow Serrano chilli, all you need to do is follow these steps:

  1. The first step is to let the serrano chili pepper seeds sprout. You do this by sowing the seeds ¼ inch deep in a seedling tray. The seed starts will need some warmth and sunshine in order to germinate properly. As it is recommended that you do this indoors, you could place a heat mat under the tray and then put the tray near a window with lots of sun exposure. Artificial lighting is a good substitute if not enough sun is entering through the window.
  2. After 2 – 3 weeks, you can transplant the young plants into the garden, or into pots to grow indoors. There should be a distance of about 12 – 48 inches apart for each young plant. Each row should be at least 24 – 36 inches apart. If you are growing them in pots, you should grow one pepper per pot. Peppers like warm temperatures so you should plant them in places that get lots of sun.
  3. The area of the garden, or the pot where you plant the peppers should have a fertile soil with a PH between 6.2 – 7 and that soil must be well drained otherwise it could cause diseases like leaf spot.
  4. Your chillies are ready for harvesting in 2.5 months starting from the day you transplant them. The plant will yield a lot of small waxy green fruits in 60 days. After 80 – 100 days, the green peppers will be big and ripe in red, yellow or orange shades. During harvesting, you use a pruning shear or sharp knife to nip off the chili pepper. The fruit can last longer if you keep the stem attached.
  5. After harvesting the peppers, you can keep them in an airtight plastic bag or plastic container in the refrigerator. Serrano chilli peppers don’t tend to do well being dried so are best pickled or made into storable sauces, jams or pickles.

Extra Growing Tips

  • If you want to get lots of yummy fruits from your Serrano chilli plant your soil must be rich in potassium, calcium, and phosphorus. In addition, you must regularly water the plant and make sure the soil is moist all the time. If your soil does not contain enough nutrients, you can put 3 – 5 inches of rich compost above the soil. You may also want to use organic fertilizer to fertilize the plant when it shows signs of fruiting.
  • When growing the plants outside in early in spring, you can use a row cover to keep them warm and protect them from the cold. If a surprise spring frost is in the forecast, it is advised that you use a frost blanket to cover and protect the young plants. The plants tend to grow poorly and the leaves may turn yellowish when the temperature falls below 55º F or 12º C.
  • It could be worth checking out tips on topping and pruning chilli plants to get a bigger yield. You can find more information about this area of chilli plant cultivation here.

Now You Know How To Grow Serrano Peppers Like A Pro

With a little dirt and some seeds, you really can create something wonderful right in your own backyard.

Now you know how to grow a Serrano Pepper plant like a pro, you’ll be well on your way to creating delicious dishes, sauces and dips to delight your family and friends.


5 Habanero Pepper Recipes To Wow Your Next Dinner Party Guests

Habanero Pepper

The Habanero Pepper is a delicious chilli that every lover of spicy flavours should try at least once in their life.Habanero Pepper

If you are one of those people, you’re going to want to try one of the five yummy habanero recipes we have collected for you below.

By serving one of these spicy, sumptuous chilli centrepieces at your next soiree you’re sure to absolutely wow all your guests like never before:

The Habanero Pepper: More About The Tasty Chilli In Question…

The Habanero Pepper is one of the world’s hottest peppers. The chillies name is derived from the name of the Cuban city of La Habana, which is known as Havana in English.

Although La Habana is not the Habanero’s place of origin, it was frequently traded there many years ago. Today, Mexico is the largest consumer of this spicy ingredient, but its flavor and aroma have become increasingly popular all over the world.

Growing Origins

The Habanero Pepper most likely originated in the Yucatán Peninsula of Mexico and even to this day the crop is most widely cultivated there. In fact, about 1,500 tons of Habaneros are harvested each year in Mexico.

Panama, Costa Rica and several states in the USA also grow and produce the chilli.

Heat Profile

The habanero is often mistakenly referred to as the hottest pepper in the world and a long time ago it may well have been until the mighty Bhut Jolokia came along. Habanero Peppers are rated 200,000–350,000 on the Scoville Scale which is pretty hot, but the Bhut Jolokia is over a million SHU on the Scoville Scale so, the Habanero is quite far behind in that respect.

Appearance

A ripe Habanero Pepper is 2–6 centimetres (0.8–2.4 in) long, 3-5cm (1 to 2 inches) in diameter and they are lantern-shaped, round or oblong. Habanero’s are green until maturity when they then turn to colours such as orange, red, white, brown, and pink.

Growing Conditions

Habaneros are similar to most other chilies and thrive in hot weather. Morning sun is ideal with slightly moist soil. In tropical regions the Habanero is a growing chilli that can produce fruit all year round. In colder climates the plant will die off in the winter naturally.

5 Habanero Pepper Recipes To Delight Your Dinner Guests

Now that you know all about the spicy, tasty background of Habanero Pepper, it’s time to get creative in the kitchen with these yummy fruits.

The Habanero’s heat, its fruity citrus-like flavor, and its floral aroma have made it a popular ingredient in hot sauces and spicy foods. In some cases, particularly in Mexico, Habaneros are placed in tequila bottles for a period ranging from several days, to several weeks, to make a spiced version of the drink.

If you’re struggling to choose from the various ways you can use habaneros in your kitchen, we’ve got our five favourite Habanero Pepper recipes below to inspire you:

1. Sweet & Spicy Habanero Pickles

For the perfect side to your meats, veggies or salads, you need to serve up these sweet and spicy Habanero Pepper pickles!

Ingredients:

  • One pint sized sterilised jar (suitable for use with heat)
  • 15-20 sliced habaneros
  • 1 cup white vinegar
  • 1 cup brown sugar
  • 1 TBSP mustard seeds
  • 1 cup sliced red onions

Directions:

  • Pack the mustard seeds, habaneros and red onions into the sterilised jar
  • Boil the vinegar and sugar until boiling
  • Pour the liquid into the jar leaving around two centimetres space at the top of the jar
  • Close the lid and leave until it reaches room temperature
  • Refrigerate
  • Serve that evening, or in a few days after the flavours have merged

2. Habanero Arrabiata

For those truly delicious Italian dinners your guests will love a spicy change to the usual pasta sauce, with this Habanero Pepper arrabiata:

Ingredients:

  • A splash of olive oil
  • One large red onion chopped
  • One habanero pepper chopped
  • One teaspoon oregano
  • Two large fat minced cloves of garlic
  • Two cans of plum tomatoes
  • A handful of ripped fresh basil
  • One veggie stock cube

Directions:

  • In a pan fry heat the olive oil and gently fry the onions, garlic and habanero
  • Once the onions are translucent, add the remaining ingredients and allow to simmer down and thicken for around 10-15 minutes
  • Season at the end and serve with your favourite pasta

3. Habanero Hellfire Chilli

This chilli recipe varies and we strongly recommend you create your own version of it. As a great, spicy, warming base recipe though, follow these steps:

Ingredients:

  • 7 Habanero peppers (chopped and seeds removed)
  • 7 Jalapeño peppers to taste (chopped and seeds removed)
  • Your favourite hot sauce (hottest you can find)
  • 3 fat garlic cloves minced
  • 5 TBSP cumin
  • 5 TBSP chilli flakes
  • 3 TBSP hot chilli powder
  • ½ a pounds of high-quality bacon
  • 1 pounds of ground pork
  • 1 pounds of ground turkey
  • 1 green pepper chopped
  • 1 large white onion chopped
  • 1 red onion chopped
  • 3 cans of tinned plum tomatoes (or similar)
  • 2 cans of chilli beans (or similar)
  • 1 can of any lager
  • 2 cups of cold water
  • 2 TBSP of chilli paste
  • Stock

Directions:

  • Cook off the bacon in a large pot then drain leaving grease in the bottom. Allow bacon to blot on kitchen towel before roughly chopping.
  • In the bacon pan cook off the turkey and pork until the meat is browned before adding in all the other ingredients apart from the beans and bacon.
  • You should add the hot sauce to your own taste and remember you can always add more at the end if you need to, but you can’t take it away!
  • Allow the mixture to cook on low for a good 45-60 minutes with the occasional stir.
  • Add the beans and bacon after about 45 minutes and then simmer for another 30 minutes before serving.
  • You may need to add stock if the mixture is too thick or thickens too much

Best served with a mixture of different options for guests like cheese, sour cream, rice, fries, bread, jacket potatoes and salad.

4. Mango Pineapple Habanero Pepper Smoothie

This recipe is a little different, and is definitely one to impress your breakfast guests when they come over. Once served, it will give you all a bit of extra spice and pep to your step for the rest of the day!

Ingredients:

  • One cup of chopped frozen mango
  • One frozen banana
  • Half a cup of cold dairy free milk or 2 TBSP of dairy free yogurt
  • One cup of pineapple
  • Half a dried or fresh habanero pepper (or more to taste!)

Directions:

  • Blend everything together and add water until you get the consistency you like
  • Serve in a glass with a straw and a little habanero garnish on the side if you’re feeling fancy

5 .Habanero Margarita

To greet your guests with something spicy, why not give them this yummy habanero pepper margarita to sip whilst they wait for your other culinary delights?

Ingredients:

  • 2 TBSP agave syrup
  • ½ a habanero chilli
  • 1 TBSP chilli powder
  • 1 TBSP salt
  • 1 TBSP soft brown sugar
  • 8 TBSP freshly squeezed lime
  • Crushed ice
  • 12 TBSP tequila
  • 2 TBSP water
  • 2 dried habaneros

Directions:

  • In a shaker or a glass mix together the chilli, agave and water
  • Strain this mixture into a bowl and rinse the glass/ shaker out
  • Mix the chilli powder, salt and sugar together and after rubbing the glasses with the skin of the squeezed limes, dip the rims in the mixture then fill the glasses with crushed ice
  • Mix together the lime, tequila and the syrup mixture you made initially in a glass or shaker and mix
  • Pour over two glasses and add a dried habanero and slice of lime to each


Can We Get An Invite To Your Next Scorching Hot Dinner Party?!

The habanero is a versatile, tasty chilli that deserves to make a statement at your next dinner party.

Whether you add it to a cocktail, or mix it into a smoothie, the Habanero Pepper is sure to make an impact at your next event.


The Chili Willy: Is It Time You Started Growing The Worlds Rudest Chili?

Chili Willy

The chili willy is a cute little pepper famed for its phallic appearance. It can be grown, eaten or just displayed as a novelty centrepiece.Chili Willy

If you’re a chili enthusiast there’s always room for more chili facts, and none can be as fun, entertaining and interesting as those about the chili willy pepper.

Let’s take a closer look at this willy shaped fruit and all it has to offer:

What Is The Chili Willy Pepper?

The chili willy is a type of Capsicum Annuum Var. Annuum, otherwise known as an heirloom pepper. You can get it in red, yellow or green varieties all of which may vary in their appearance to some degree.

You can find the pepper most commonly cultivated across Mexico, Texas and Asia, although you can get seeds and plants worldwide.

Nobody knows if this plant was bred to look as rude as it does, but these days it is equally used for food and novelty.

Some people absolutely love its spicy flavour, but for some, the joy of seeing such a weird and wonderful plant growing in their home or garden is enough of a return on their cultivating investment.

Where to Buy Chili Willy Peppers

Laugh away, it’s totally ok. It’s not hard to understand why this unique chili is rude, crude and outright fantastic. Also known as Peters Peppers or Penis Peppers, the Chili Willy Peppers have a very distinct willy shape.

When it comes to buying these peppers it can be difficult in some areas where seeds or plants are more difficult to come by.

Some countries, though, have an abundance of plants and seeds on offer so it really does depend on your location.

Chili Willy Peter Pepper Appearance

When you see it, you can’t ignore its shape. The chilly willy or peter pepper is accurately named. When fully grown and ripened, the chili pod has a long conical shape and a bulbous end that shares an uncanny resemblance to… well we all know!

It doesn’t only look good but also tastes spicy so you can cultivate it not just for show, but for use in lots of different recipes like pickles, sauces and even sweet dishes like chocolate chilli pots.

At the very least you can use it as a garnish to give your guests quite the shock.

Attending a dinner or BBQ with this chili is also a good conversation starter between your family and friends so do consider the chili willy as a gift next time you attend an event.

Chili Willy Penis Pepper Taste and Heat

These naughty peppers are medium-hot to pretty darn fiery (reportedly in the 10,000 to 23,000 Scoville Scale Units range) and are really great tasting (fantastic for spicing up salsa as well as conversation).

The texture is not meaty or dense like a jalapeño, making them ideal for drying and using at a later date.

Once you get past the laughs, there’s a pretty significant hot pepper here – hotter than a jalapeño. They are hot enough to stop you giggling once you get stuck in to trying one, that’s for sure.

Growing Your Own Chili Willies

You might be able to find chili willies at farmer’s markets if you are lucky, but if you really want chili willy peter peppers, you’re going to need to invest time into growing them.

Peter pepper seeds are often widely available online, and that’s how this chili has survived and grown its cult following over the years.

Here’s how to grow your own chili willies:

  1. Place your chili willy seeds into potting soil in a warm spot long before the last frosts are due. You’ll want to gently pat some soil over the top and then sprinkle some water over the seeds. You can find some handy tips on germinating your seeds quickly in this Youtube video.
  2. Once your seeds have germinated you should keep the soil moist, but not drenched – watering when the top layer of soil looks dry.
  3. When the chili plants have a few sets of leaves you can thin them out and plant them out (if it is warm enough and the time for frost is over). They can either go about 20 inches apart in a greenhouse, polytunnel or garden (if your climate is hot enough) or one to a ‘permanent’ pot if you are growing indoors.
  4. Once your plants are growing nicely in their permanent spot you should take care to fertilise them and prune them as needed so you get full, bushy plants to harvest from. You can harvest around 18-20 weeks from planting the seeds if the proper care is provided to the plants.

The key to growing healthy chili willy plants is to ensure they get enough sunshine and plenty of drainage. One of the quickest ways to kill any chili plant is to grow it in soil that does not drain well.

The excess moisture can cause mineral buildup, root rot and it can lead to fungus issues on the leaves.

Your plants should have really well draining soil that doesn’t drain so fast nutrients are lost, but that also doesn’t hold onto moisture so much your plant gets sick.

Will You Be Eating Or Growing Chili Willies Soon?

This is one naughty pepper, that’s for sure. In fact, it gives the popular term “food porn” a whole new meaning.

If you want your own peck of peter peppers, you’ll need to be on the look-out (or get ready to grow them).

But, when you do find chili willies, enjoy the laugh along with the good taste.


Cherry Pepper Plants – Growing, Harvesting And Eating

Cherry Pepper

The cherry pepper is an adorable pepper type that looks just like a cherry with bright red flesh and a smooth, round shape.Cherry Pepper

It’s great for growing and eating as it has a dense, fresh spicy flavour just like the jalapeño.

If you’re thinking of growing or cooking with these cute little peppers, it’s handy to know more about them.

From origins, to growing tips and cooking tips, here’s everything you need to know about the cherry pepper plant:

Cherry Peppers – What are they?

The Cherry Pepper also known as the Cherry Chili, chili tomato, cherry bomb or Hungarian cherry pepper and is a fantastic chili to grow. It can be used to replace a pimento chilli, although pimentos are hotter.

The mild to hot cherry pepper is commercially grown in the USA, Europe and Mexico and its cultivation records go back as far back as 1543.

Appearance & Heat

The peppers produced by these plants are small and round, they resemble a cherry tomato. Peppers tend to range from mild to hot and register 5000-8000 scoville scale units.

The cherry peppers grow a dark green colour and as they ripen they will change to a very vibrant red which makes them truly spectacular to grow.

Different Types

There are different types of cherry peppers in cultivation which are slightly different in how they taste. One is generally softer than the other in texture, and both are sweet, spicy and quite crunchy overall. Both types of cherry pepper put out a great level of juiciness which makes them delicious as a pickled or sliced pepper, but not suitable for drying.

Common Cuisine Use

The chili tomato is commonly used in Asian, Southwestern, Mediterranean, Portuguese, African and Mexican cuisine because of the size and shape. This chili is also a great garnish and really puts some colour into food, especially salads.

These chilies are also great for stuffing or picking because of the thick fruit walls and round shape. Due to the thick walls, though, this chili type cannot be dried.

Growing Tips For Cherry Pepper Cultivation

As with most chili’s this plant enjoys hot climates, well drained soil and generous amounts of water. Maturity takes approximately 120 days. These plants can mature and fruit at a small size so they are great for a small bench or windowsill.

Those who live in a flat or apartment may particularly appreciate the growing ease and size of the cherry pepper plant.

Because they are only around 40cm in height they take up no space at all and they can be purchased for as little as $6 dollars or less in some places.

Although you may only get one fruit a week from one plant, it’s certainly a great kitchen windowsill or balcony plant to have if you want to try some urban gardening.

How To Eat Cherry Pepper Fruits

As we mentioned above, there are multiple uses for the cherry pepper fruits and how to cook with them. Because of their size, it’s important to use the fruit efficiently so as not to waste the heat or flavour, especially if you are growing your own.

They sit at about 5,000 on the Scoville Scale so they are suitable for many dishes, especially if you find a jalapeño (8,000 SHU) too spicy.

To help you eat these yummy chillies we’ve got some great recipes for you to try below:

Cherry Pepper Layered Sandwich

Taking inspiration from sandwich expert Max Halley, we love this layered sandwich featuring the cherry pepper:

Ingredients:

  • Pickled cherry peppers
  • Any deli meat such as beef or turkey
  • Little gem lettuce leaves
  • Sundried tomato spread
  • Cucumber slices
  • Avocado
  • Garlic aioli
  • Toasted sourdough

As you can see, there are no ingredient amounts above. You simply construct the sandwich to the girth you like, creating a yummy, spicy sandwich anybody will love.

Cherry Pepper Vegan Wrap

If you are one of the 7.3 veggies, of which many are vegan in the US right now, you might want to match your cherry peppers with a delicious no-meat substitute. Here’s a delicious cherry pepper vegan wrap to try:

Ingredients:

  • One thick wrap such as naan
  • Homemade tahini sauce (1 TBSP tahini, 1 TBSP lemon juice, 1 crushed garlic clove, salt pepper and extra water to taste)
  • Sliced cherry peppers to taste
  • Any lettuce leaves
  • One thinly sliced tomato
  • One thinly sliced inch or two of cucumber
  • Half a red onion sliced
  • Warm falafel or homemade seitan (or even chickpeas if you like)

Warm up your naan or wrap, throw on your ingredients (adding more or less of any you like) and get stuck in!

Hot Pepper Jam

If you want to conserve your cherry peppers, making a jam out of them will make them last longer, and enable you to enjoy them with multiple meals this way too.

Ingredients:

  • 2 ripe red peppers (bell)
  • 4-6 hot cherry peppers
  • ¼ cup clean water
  • ¼ cup apple cider vinegar or white wine vinegar
  • 1 ½ cups organic brown sugar
  • 2 TBSP pectin

Directions:

  • Sterilise three standard jars with lids (make sure they are suitable for hot liquids)
  • Deseed and chop both pepper types and put them into a saucepan with the water and vinegar
  • Whilst the mixture is heating up, mix two TBSP of the sugar with the pectin in a cup and pour it into the pan
  • Allow the mixture to boil and stir (do not stop stirring)
  • Add the rest of the sugar
  • Place the jelly into the jars leaving a couple of centimetres at the top
  • Wipe any excess from the jars and then place the lids
  • Allow the jars to cool to room temperature then place the jam in the fridge

The mixture will stay fresh for three weeks in the fridge and works well with sandwiches, meat dishes, with hot pie, as a barbecue relish and even as a base for meat marinades.

How Will You Enjoy Your Cherry Peppers?

Now you know all about these cute, yummy fruits, how will you add more of them to your life?

Whether you grow them, cook with them (or both) you’re sure to enjoy the sweet, spicy flavour of cherry peppers in your home kitchen.


Hotter Than Hot: Everything You Need To Know About Growing Carolina Reaper

growing Carolina Reaper

Over the last few years the Carolina Reaper chilli has found fame as its scorching 1,569,300 score on the Scoville scale found heat seekers from allgrowing Carolina Reaper over the world wanting to see if it’s heat is really as hot as it’s famed to be.

There was that famous Carolina Reaper nacho challenge, but there are also multiple videos of people trying the chillis themselves, if you’re in the mood for seeing some suffering!

Since it found fame, the amount of people growing Carolina Reaper has soared, as gardeners old and new look to grow the world’s hottest chilli at home.

If you’re thinking of growing Carolina Reaper, there’s a lot to know to make sure your Carolina Reaper plant grows successfully.

To help you, we’ve created an easy guide to growing Carolina Reaper well, so you can enjoy your very own scorching hot chilli peppers at home:


Why Grow Carolina Reaper Chilli Pepper?

Growing Carolina Reaper plants is a great idea if you want to create a plant that is a bit of a legend. If you truly want the hottest of fruits, it is the plant to choose.

If you’re still not sure, here are some benefits to growing Carolina Reaper plants:

Gardening Is Good For You

Many studies tell us that gardening is incredibly good for us. Physically it gets you stretching and moving. Mentally it can decrease stress and anxiety, give you hope and help you with mindfulness. Growing Carolina Reaper plants is just as beneficial as nurturing a whole veggie patch too, because it’s still gardening.

Chilli Peppers Are Good For You

Chilli pepper, like those grown on the Carolina Reaper plant, is known to be really good for you, offering benefits such as; reducing headache pain, helping reduce non-allergic rhinitis symptoms, boosting your metabolism and even soothing arthritis, to name a few.

If You Want To Grow The Hottest Chilli Pepper, This Is The One

The reason that we know Carolina Reaper plant pepper is the hottest is because it is measured with the Scoville Scale. The Scoville Scale was named after Wilbur L. Scoville who made the test whilst trying to find a chilli to use in a warming topical skin cream.

The scale actually focuses on how much Capsaicin is in a chilli pepper, which is the part of the pepper that causes the sweating, burning and general discomfort.

As Carolina Reaper reaches on average 1.5 million on the Scoville Scale, it is currently the hottest pepper currently grown and requires latex or plastic gloves to handle it safely.

There Are Multiple Recipes To Enjoy With Carolina Reaper

You can use Carolina Reaper plant pepper as it is in recipes, but it is generally best used in preserves and sauces. We particularly love this 25 year old hot sauce recipe and this Carolina Reaper plant chilli recipe. You can also experiment integrating it into meals and sides you usually make.

You’ll Probably Do Well Selling Them

The Carolina Reaper plant pepper is still famed for being the hottest pepper, which means many people still want to try it. So if you do intend to sell your produce locally, or even do produce swaps, your Carolina Reaper chillies will probably do really well. Everybody wants to try the famously hot chilli!


Top Tips For Growing Carolina Reaper Peppers Well

If you do feel ready to start growing Carolina Reaper peppers, here are some useful tips to help you grow a healthy Carolina Reaper plant:

Start Indoors First

You should grow your Carolina Reaper plant indoors in potting soil for the first six weeks (in a poly tunnel, greenhouse or at home) before you put it in its permanent growing position.

Don’t worry if the seeds haven’t germinated right away as it can take up to a month or more with the Carolina Reaper plant.

To speed up germination, some people swear by freezing the seeds a few days before planting, which mimics the winter to spring temperature change and can spur the seeds to start growing. Another great tip is to soak the seeds in tepid brewed black tea for half an hour before planting, as it softens the seeds up and again makes it more likely for the germination process to happen.

Keep Your Seeds Safe

Carolina Reaper plant seeds can sometimes cost a lot of money, and you may well want to keep some aside until you have your own fruits to take seeds from. To keep unplanted seeds safe, keep them in a dry, dark place that doesn’t see any huge temperature changes.

Ensure Good Drainage

All plants do well with good drainage, but it is especially important when growing a Carolina Reaper plant. A clear drainage hole, lots of horticultural grit and regularly emptied trays are important to prevent root rot and disease.

Pick A Sunny Spot

Whether indoors or outdoors a Carolina Reaper plant requires full sun for 10-12 hours a day and temperatures 20 degrees Celsius or higher in the day and no lower than 10 degrees Celsius at night. Most people grow chillies indoors so that they get the warmth and sun that is needed.

Fertilise With Consideration

So many gardeners disagree over when and how much to fertilise a Carolina Reaper plant. The fact is that they don’t need to be fertilised more than twice. Once when the seedlings are planted in their final space, and once when the fruits begin to appear.

However, many gardeners swear by using special types of fertiliser at different times and they get good results.

For that reason, when you start growing Carolina Reaper plants it is best to do your own research on fertilisation so that you can decide the best approach for your particular plants.

As long as you fertilise sparingly and with consideration, you’re at a much lower risk of burning your plants through fertilising too much.

Prune With Fruit Abundance In Mind

There are certain pruning methods that tend to produce better yields of peppers when growing Carolina Reaper plants, or other hot chilli peppers.

This video takes you through the process of pruning your Carolina Reaper plant step by step to get the best possible fruit yield.


Are You Ready To Start Growing Carolina Reaper Peppers?

If you now feel ready to start growing Carolina Reaper in your home, follow our tips above and have fun! If your first attempt at growing Carolina Reaper fails, you can always try again.

Soon enough, you’ll have plenty of scorching hot Carolina Reaper fruits to enjoy in your recipes keeping things truly spicy in your home kitchen!

Chilli Plant Care: 7 Huge Mistakes To Avoid When Growing Chillies

chilli plant care

Chilli pepper plants produce yummy, spicy fruits that can be used in all kinds of delicious recipes. chilli plant care

That is, however, only if you get chilli plant care right and grow healthy, strong plants that produce fruit.

Unfortunately, many mistakes can scupper even the most dedicated gardeners’ chilli growing plans.

From diseases, to pest damage, stunted growth and more, there are many issues people run into when growing chilli plants.

To help you produce delicious chilli fruits on healthy, happy plants, here are 7 huge mistakes to avoid when growing chillies:


1.   Using Compost With The Wrong Amount Of Nutrients

Good chilli plant care involves growing your chillies in a good-quality compost once you pot them up, as shown in this video.

However, a common mistake is assuming that compost contains everything your chilli plant needs to thrive. If your plant is growing well, the chances are it does have everything it needs to thrive.

If you’re seeing any issues with the plant, it could be the soil. Here are some common signs the compost needs adjusting:

  • Low Potassium – any new leaves come through with yellow edges
  • Low Manganese – older leaves show yellow spots and holes (potentially in newer growth as well)
  • Low Nitrogen – older leaves start yellowing and the yellow spreads up the plant eventually
  • Low Iron – yellow patches start showing between the veins of the leaf
  • Low Calcium – new leaves have a crinkled look
  • Low Phosphorus – Older leaves go really dark, or even purple and the damage spreads up the plant
  • Low Magnesium – yellowing older leaves starting from the tips and moving inwards

Once you have identified the deficiency (and ensured the problem is not a pest or disease) you can add nutrients to the soil accordingly.

2.   Reacting Rather Than Preventing

There is a lot of chilli plant care advice that works on the idea of reacting, rather than preventing common issues. This is a mistake, as often prevention is better than cure. Lots of simple precautions taken when growing chillies prevents a multitude of issues.

Here are some preventative tips to follow when growing chillies:

  • Keep plants with plenty of space between them (two foot if grown in a bed) or one to a pot so that there is lots of airflow between plants
  • Always ensure plants dry between watering
  • Ensure your watering regime is regular, so plants don’t get stressed
  • Water plants in the morning or evening to avoid leaf burn
  • Keep your plants growing in a stable temperature
  • Trim your plants to encourage plenty of airflow & good fruit growth

3.   Assuming The Plants Will Be Pollinated

If you grow your plants outdoors, the pollination aspect of your chilli plant care is usually minimal. Hopefully pollinating insects will do their job and ensure you get plenty of chillies growing.

However, if your plants grow inside or pollination is an issue, you will have to lend a helping hand. You can do this by gently tapping the flowers everyday, or using a paintbrush or makeup brush to spread the pollen from flower to flower, just like a bee would.

4.   Over Fertilising

With chilli plant care, over fertilising is a common issue. Gardeners can get a bit overzealous with the fertiliser, which then damages the plant. When you’re growing chillies, you actually need to only fertilise your chilli pepper plants twice.

Once when you apply the compost for them to grow after moving juvenile plants into their permanent growing position. If the compost is full of the right nutrients, you only then have to apply fertiliser again when the plants have started to form peppers.

5.   Shallow Watering

Gardeners can water a little everyday, leaving the soil moist and the plant never getting a proper drenching, which can lead to plant disease, stress and stunted growth.

For the best chilli plant care you have to water deeply, regularly and when the soil has dried out to the first two inches of your finger.

6.   Lack Of Drainage

If the water cannot drain out of your pepper plants well enough you may get root rot, which will eventually kill the plant. Any salts and unwanted nutrients may also not be able to rinse out of the plant, which could also be a problem.

To avoid this and maintain good chilli plant care you simply need to ensure that water can rinse through the soil well by adding some horticultural grit to the compost, ensuring the drainage hole is blocked and making sure the trays they sit in are regularly emptied.

7.   Ignoring Pest Issues Before It Is Too Late

If your chilli plant care seems to be going well everyday, you may not necessarily do a deeper check of your plants until you see a reason to act. Unfortunately, by the time there are signs of pest issues it can be too late.

If you can, use a magnifying glass or a loupe to spot check your growing chillies and the plants they are on once a week. Check for eggs, living animals, webbing and dirt. If you are unfamiliar with the kind of pests seen most commonly on chilli plants, you can learn more about them in this handy article.

Spotting these pests early means you can treat your plants with safe pesticides before they take hold and scupper your chilli plant care.

“To forget how to dig the earth and tend to the soil is to forget ourselves.” – Mahatma Gandhi

The 7 common mistakes with chilli plant care above can be easily avoided with some quick adjustments to your chilli plant care regime and habits.

With the right adjustments, you’ll be growing chillies well this season, for delicious, spicy fruits to use in all kinds of wonderful recipes in your home kitchen.


5 Red Chilli Plant Recipes To Spice Up Your Kitchen

Red Chilli Plant

Are you growing a lush red chilli plant?

If you are, you have no doubt been delighted with the process of growing your own spicy, hot fruits.Red Chilli Plant

Even more exciting is the next step – using your yummy home grown produce!

There’s a world of tastiness ahead with meals, drinks and snacks featuring your very own super hot pepper as the star of the show.

To inspire you to use your red chilli plant produce in your home cooking, here are 5 delicious recipes that make the most of your red chilli plant fruits:

1.   Chilli Pepper & Tomato Pasta

This recipe creates a delicious spicy sauce that you can batch cook and freeze for use at a later date. It’s perfect for pasta, but can also be used with rice, as a base for stews and even watered down with stock and enjoyed as soup.

Serves 2

Ingredients:

  • Two tins of plum or chopped tomatoes
  • Crushed garlic cloves (to taste)
  • One large finely chopped onion
  • One vegetable stock cube
  • One super hot pepper from your red chilli plant (finely chopped)
  • Pinch of salt and pepper
  • A TBSP of cooking oil & olive oil for drizzling
  • Two servings of your pasta of choice

Method:

  • Heat your cooking oil in a frying pan on a medium heat before adding your super hot pepper, onion and garlic.
  • At the same time, boil your pasta as per the packet instructions, drain and cover when cooked.
  • In your frying pan cook the ingredients until the onions are translucent. If the garlic begins to catch, add a little bit of water to the pan.
  • Once the garlic, onions and super hot pepper have cooked down add the tinned tomatoes and crumble the stock cube in. Allow to cook down for at least ten minutes on a low to medium heat so the mixture is bubbling.
  • After around 10-15 minutes the mixture should be thick and saucy. You can always add some water to thin it down. You can now season the sauce to taste with salt and pepper.
  • Add the drained pasta to the frying pan and mix the pasta and sauce together.
  • Serve up on a plate or bowl with a few splashes of olive oil.
  • To jazz the dish up you can also sprinkle dried chilli flakes, cheese and fresh basil when serving.


2.   Chilli Chocolate Avocado Mousse

This recipe is a fantastic option if you need a vegan, gluten free dessert for your family, or guests to enjoy. It’s also very easy to make, so it impresses without exhausting your cooking skills or free time.

Serves 4

Ingredients:

  • Two medium avocados that are ripe (find out how to check the ripeness of avocados here) with the flesh scooped out
  • ½ cup of dark vegan cocoa powder
  • 3-4 TBSP soya milk or dairy free milk
  • ½ TSP vanilla extract
  • A pinch of salt
  • ¼ cup vegan suitable liquid sweetener such as agave
  • 1 super hot chilli chopped into thin slivers or slices if the pepper is thick. If it is thin and/ or small in size you can dry it whole.

Method:

  • Preheat the oven to around 180 degrees
  • Place the chilli from your red chilli plant on a non-stick oven sheet or tray and allow to dry in the oven for at least four hours. It makes sense to do this with a batch of multiple peppers to save energy. If you haven’t done this before, here’s a video to show you how to dry your red chilli plant
  • Place one of your dried chillies chopped into small pieces into the blender along with all the other ingredients and blend in full until you can no longer see any green from the avocado.
  • Place into ramekins or small bowls in the fridge and allow to set for a few hours (ideally overnight).
  • Serve with one of your dried chillies on top (for display) and a few vegan chocolate chips or a square of dark vegan chocolate on top.

3.   Spicy Sauerkraut

Sauerkraut is incredibly delicious, but Healthline tells us it is also incredibly nutritious too, so it’s a great recipe choice when it comes to making the most of your red chilli plant fruits.

Ingredients:

  • One medium white or savoy cabbage roughly shredded
  • 2 TBSP good-quality salt (IE not table salt)
  • 1 large white onion roughly chopped and shredded
  • 1 grated carrot
  • 1 large super hot pepper from your red chilli plant finely chopped
  • 1 TBSP mustard seeds

You will also need a sterile jar with a lid to put the sauerkraut in.

Method:

  • In a bowl mix together the cabbage, carrot, chilli pepper, salt, onion and mustard seeds.
  • Massage the mixture until the veggies soften and water is released into the bottom of the bowl.
  • Put the veggies into your sterilised jar, squishing it down until all veggies are underneath the juices that have been released.
  • Leave at least an inch of space at the top of the jar for expansion.
  • Seal the jar with a lid and leave in a room/ cupboard without any extreme temperatures or direct sunlight.
  • After a few weeks the fermentation process will be well underway and you can eat the sauerkraut. You will want to pop it in the fridge at this point, and eat it up within 4-6 months if you ensure it stays bacteria free (sealing the lid after use and using clean utensils to serve it).

4.   Chilli Martini

For a little grown up fun, this chilli martini is a spicy, yummy twist on the traditional martini cocktail.

Serves 1

Ingredients:

  • 1 super hot chilli from your red chilli plant striped of seeds
  • 1 TBSP of sugar and water mix (in equal parts)
  • 1 generous shot of vodka
  • 2 shots of pineapple juice
  • Half a cup of ice

Method:

  • If you have a cocktail shaker, shake the chilli and sugar/ water mix together. If you don’t, mix them well together in a jar or glass.
  • Add the vodka and pineapple juice to the chilli and sugar/ water mix.
  • Mix everything together either stirring or shaking well for around half a minute.
  • Strain or sieve the mixture into a nice glass, adding sugar to the wet rim of the glass if desired.
  • Garnish with one of your chillis split and placed on the side of the glass.

5.   Sun Dried Tomato Chilli Ketchup

This recipe is a great option if you want to stretch the use of your red chilli plant produce and enjoy their flavour time and time again.

Ingredients:

  • 1 TBSP of any flavourless oil
  • 1 super hot chilli from your red chilli plant, chopped
  • 4 TBSP tomato purée
  • 2 TBSP paprika
  • ⅓ cup red wine vinegar
  • ¼ cup brown sugar
  • 1 TSP good quality salt
  • 1 TSP black pepper
  • 2 cups of ripe tomatoes
  • Chopped garlic cloves (amount to taste)
  • ½ TSP hot chilli powder
  • A few sun dried tomatoes

Method:

  • Heat the oil in a saucepan or deep frying pan on a medium heat.
  • Cook the onion, garlic and chilli until the onion is translucent, then add the tomatoes, tomato purée, chilli powder, paprika, salt, pepper and cook until thick (about 15 minutes).
  • Blend the tomato mixture with the sun dried tomatoes, vinegar and sugar and cook for 15 more minutes.
  • Allow to cool, covered.
  • Decant into a sterilised jar with a lid and place in the fridge.
  • Use the ketchup within around 4 weeks.

What Will You Cook With Your Super Hot Chillies?

Hopefully our above recipes have you feeling incredibly inspired to make all kinds of yummy meals and drinks with your spicy fruits. Before long, you’ll wonder how you even ate before you grew your own red chilli plants!

Bon Appétit!


Banana Peppers and How to Grow

Banana Peppers

Banana peppers are a yellow pepper with waxy skin from the chili pepper family. It is thus named because its color and shape looks like the tropical fruitBanana Peppers banana. Most of the time, the fruits it yield are deep yellow color when fully mature but they can also be red or orange color sometimes.

There are many varieties of banana peppers including mild and hot varieties. Mild banana pepper varieties can be harvested faster than the hot banana pepper varieties. Regardless of whether it has a mild or hot flavor, it tastes delicious when used in salad, sandwiches or other recipes.

You can germinate banana pepper plants indoor during the spring or summer when the temperature is warm. The young plant is ready for transplant when it has outgrown the seedling tray. It should be spaced about 18cm – 24 cm apart and each row should be about 24 cm apart.

The temperature should be above 60 degree Fahrenheit when you transplant them. It should be transplanted to an area of your garden that is not exposed to too much wind and receives full sun. In order for it to grow healthily, it needs a minimum of 6 hours of sunshine daily.

If your soil is not fertile, you can mix in compost and manure fertilizer to increase the nutrients. Nitrogen fertilizer should not be used as it only cause more leaves to grow without the increase yielding of fruits. If your soil lack of magnesium, you can spray some Epsom salt on it. It is encouraged to use mulch to reduce weeds and maintain the soil moisture level.

The banana pepper plant will become thirsty quickly so you must regularly water it. When watering, just water enough to keep the soil slightly moist. Lack of watering can cause the fruit to taste bitter. Heavy watering can cause the soil to become waterlogged which can eventually destroy the roots. Watering the plant is during the evening can prevent diseases.

If the plant grows too tall and become lanky, you can set up a trellis or wooden sticks to provide support for it. Peppers do best when the temperature is around 60 degrees Fahrenheit. If the temperature reaches beyond 90 degree Fahrenheit, the blossoms can wither away. To protect your plant from the scorching sun, you can set up a shelter to provide some shade.

You can harvest the banana peppers when they reach full size and the skin is thick and firm. As soon as they become yellow color, you can harvest them. You can also wait for it to turn red or orange color to harvest them. When harvesting, use a pair of scissor to nip it off rather than pulling it off the plant with hand. Banana peppers is best used to make pickles when they you are not able to use them within a week.

Anaheim Peppers and How to Grow

Anaheim Chili Peppers

Anaheim peppers, also known as New Mexican chili, was first grown in Hatch Valley in New Mexico, California. It is a mild type of chili pepperAnaheim Chili Peppers that scores in between 500 – 2,500 in the Scoville heat rating. The thick walled pepper can add both sweet and spicy taste to your dishes. It is a tradition for the New

Mexicans to string together dried Anaheim peppers to make chili ornaments.

Growing Anaheim pepper starts with sowing the seeds indoor in a seedling tray with shallow potting medium. Each seed is to be sown ¼ inch deep in the potting medium. To create an ideal condition, you can place the tray near the window where there is some sunlight and use a heat mat to keep it warm.

After 2 – 3 weeks, you can transplant the pepper plant to a sunny area in the garden. During transplanting, the soil temperature must be above 55 degree Fahrenheit and the day time temperature must be above 65 degree Fahrenheit. Anaheim pepper requires light and well drained soil. If your soil is heavy like clay soil, you can add compost or sand to make it lighter. Compost can also be added to fertilize the soil.

Prior to transplanting, you can perform a soil test to check the soil pH. The ideal soil pH for growing Anaheim pepper is in between 5.5 – 7. If the soil has low pH, you can raise it by adding limestone. Adding sulfur can reduce the pH of the soil. If you live in a cool region, it is recommended that you use black plastic to mulch the soil so as to keep the young plants warm. Mulching also helps to prevent weeds from growing.

The seed should be planted in rows that are at least 1 feet apart and each seed should be spaced at least 2 feet apart. If you are growing in a raised bed, the seeds should be planted about 14 inches apart. It is important to water the plant consistently. You must take care not to water it too much as it can cause the plant and fruit to rot.

Healthy Anaheim pepper plant can reach up to 18 – 24 inches tall. You must wait for at least 74 – 80 days to harvest the fruits. When the first fruit appear, you can fertilizer it with a 5-10-10 fertilizer. As a rule of thumb, you should avoid using too much nitrogen as it can reduce the fruit growth.

Each pepper can grow up to 7.5 inches long. When unripe, it is light green in color but it will turn into deep red color when fully mature. It will be laden with heavy fruit in the summer if the temperature at night is not higher than 90 degrees.

Red Pepper Hummus Recipe

Red pepper hummus

Red pepper hummus is a healthy snack that can effectively fill your hunger cravings in between your meals. Making your own red pepper hummus isRed pepper hummus the healthiest option as store bought versions are often salty and have a lot of additives.

Not only is it healthier to make your own hummus but it is also cheaper and you can make more for your family. It is incredibly easy to make your own red chili pepper hummus.

The main ingredients used in making this recipe are roasted red peppers, chickpeas, and jalapeno pepper. All these ingredients are rich in antioxidants and vitamin C. Chickpeas is beneficial for your health in many ways.

Scientific research has proven that it can reduce cholesterol level and colon cancer risk. Hummus is a rich source of fiber and eating it regularly can improve your digestive system. Fiber rich food can also help to control the blood sugar level.

Ingredients
2 medium red pepper (cut into strips)
1 large jalapeno pepper (deseeded and chopped to small pieces)
2 ½ cup chickpeas (soaked overnight)
½ tsp cumin
3 tsp paprika
3 tsp red pepper flakes
juice of 1 lemon
2 tbsp olive oil
½ tsp sea salt

Instructions

  1. The first step is to roast the red pepper in the oven. You must first cut the red peppers into medium strips and then put them on a baking tray. The seeds and majority of the white pith should be removed prior to baking. Bake at 450 degree celsius for about 10 minutes until the edges are slightly brown in color.
  2. While it is baking, you can add the jalapeno pepper, chickpeas, lemon juice, tahini, and cumin in a food processor. When the red bell pepper is baked, take it out and wrap it with a sheet of aluminum foil. You can place it under the cover to cool for at least 30 minutes. When it is cooled down, you can easily peel the skin.
  3. After peeling the pepper, chop it into small pieces and add it into the food processor. At this point, you can add the 2 tbsp olive oil. You can add more olive oil to obtain a smoother texture. Pulse for 1 minute and then stop to add 1 tbsp water. If you want the hummus to be thinner, you can pulse for longer time and add more water.
  4. The hummus is now ready to serve. There are many ways to garnish the hummus. Some people like to sprinkle red diced peppers or red pepper flakes on top. You can garnish with fresh herbs like parsley sprigs. You can eat it directly with a spoon. It is best served with crackers, vegetable sticks, or pita bread. If you want to save for tomorrow, make sure you keep it in an airtight container in a refrigerator.